Recipe by Silvia Baldini — Fresh fried sage leaves are a lovely light starter or snack. They’re crunchy, salty and imbued with the milky, buttery and slightly tangy flavor of farm cheese.
Recipe by Silvia Baldini — Fresh fried sage leaves are a lovely light starter or snack. They’re crunchy, salty and imbued with the milky, buttery and slightly tangy flavor of farm cheese.
Choose sage leaves that are as similar to one another in size as possible. Rinse and pat them dry.
In a bowl, mix
In a bowl, mix together the stracchino or fresh farm cheese, pecorino cheese, pepper, and chives.
Place the cheese mixture in a pastry bag or a large resealable plastic bag. If using a plastic bag, snip off one of the bottom corners with scissors. Squeeze all of the cheese mixture onto half of the sage leaves.Place the remaining sage leaves on top to create stacks.
Place the flour in a shallow bowl. In a separate shallow bowl, lightly beat the eggs.
Dredge the sage stacks in the flour, turning to coat all sides. Dip the floured leaves in the beaten eggs, allowing any excess to drip off, and then dip them in the bread crumbs, then again in the eggs and once more in the bread crumbs.
In a wide, deep-sided saucepan or a pot over medium heat, add enough oil to measure 2 inches and heat it to 350°F. Line a plate or baking sheet with paper towels.
Fry a few of the sage parcels at a time in very hot oil until golden. Drain on paper towels, sprinkle with salt and serve immediately.
Recipe by Silvia Baldini — I'm a big fan of thick and crunchy rhubarb stalks. I especially appreciate the sourness of the field-grown plants, which are pronounced in flavor and have cherry red stalks and deep green leaves. Rhubarb season starts now, in March and it peaks in June-July. I recently found a good looking bunch at my local store and I couldn't resit baking a few tartlets. I prefer to free form my tartlets and bake them on rimmed baking sheets, always lined with baking paper, to catch the inevitable cooking juices. You can also make a large tart in a removable bottom pan, however I personally enjoy a little chaos in my kitchen. I brush the dough with melted butter and sprinkle it with sugar to make a crispy crust. I cover the bottom of the tartlets with a couple of spoons of almond flour to absorb the cooking juices. Even if it's not season yet, I decided to threw in a handful of sliced strawberries to help balance the rhubarb tartness, (blueberries, cherries or pineapple chunks would work as well).
Recipe by Silvia Baldini — I'm a big fan of thick and crunchy rhubarb stalks. I especially appreciate the sourness of the field-grown plants, which are pronounced in flavor and have cherry red stalks and deep green leaves. Rhubarb season starts now, in March and it peaks in June-July. I recently found a good looking bunch at my local store and I couldn't resit baking a few tartlets. I prefer to free form my tartlets and bake them on rimmed baking sheets, always lined with baking paper, to catch the inevitable cooking juices. You can also make a large tart in a removable bottom pan, however I personally enjoy a little chaos in my kitchen. I brush the dough with melted butter and sprinkle it with sugar to make a crispy crust. I cover the bottom of the tartlets with a couple of spoons of almond flour to absorb the cooking juices. Even if it's not season yet, I decided to threw in a handful of sliced strawberries to help balance the rhubarb tartness, (blueberries, cherries or pineapple chunks would work as well).
10mediumstalks rhubarb, (trimmed and cut into 4-inches pieces)
½mediumorange zested, organic
½cupfresh orange juice
2tabelspoonsHoney
⅔ cup granulated sugar
1 ½tablespoons corn starch
4tabelspoonsalmond flour
1 ½ tabelspoonsmelted unsalted butter
granulated sugar, for finishing the tart
Servings: individual tartlets
Instructions
Make the dough
In a food processor, pulse the flour, orange zest and salt. Add the butter and process briefly. Sprinkle over the ice-cold water and pulse for about 5 seconds, until just moistened.
Transfer the dough to a floured work surface and knead it 2 or 3 times until it comes together. Pat the dough into a disc. Lay a sheet of baking parchment on your work surface and dust it with flour. Roll out the dough and shape in 4 individual circles, about 5 inches in diameter or make an individual 13 inches circle, 1/4 of an inch thick to use in a tart pan. Transfer the parchment to a rimmed baking sheet and chill the pastry in the refrigerator for at least 30 minutes.
Make the filling
Preheat the oven to 400°F.
Toss the rhubarb in a bowl with the orange zest, juice, honey, sugar, salt, corn starch and mix well.
Assemble the tartlets
Sprinkle the almond flower at the bottom of the rolled out tart or divide between the individual tartlets.
Arrange the rhubarb on top of the pastry and sprinkle over any remaining sugary mixture. Leave a border of 2 inches around the edge of the pastry, fold in and crimp with a fork. Brush the fruit with melted butter and sprinkle with caster sugar.
Bake for 10–12 minutes, then lower the oven temperature to 375°F and then bake for a further 30–35 minutes.
This one pot vegan meal is the ultimate immunity buster. It’s packed with a balanced mix of plant based ingredients and natural anti-inflammatories like turmeric and ginger. It’s a pure and simple braise with complex flavors from the fennel and a toothsome touch form the chickpeas.
Vegan Chickpea Stew with Fennel, Ginger and Turmeric
4cupsshredded kale or Swiss chard, or cabbage cabbage or Swiss chard
½lemon
3tablespoonsfresh parsley leaves, roughly chopped
Servings: people
Instructions
Heat 2 tablespoons of olive oil in a large heavy bottom pot. Add the onion, celery, garlic and a pinch of salt and pepper. Cook over moderate heat until the vegetables are softened, 10 minutes. Stir in the ginger, turmeric and cumin powder.
Add chickpeas, fennel and vegetable stock, then bring to a boil over medium high heat. Stir in the tomatoes, parsley and the bay leaf. Lower the temperature to a simmer, cover the pot and cook for about 25 minutes.
Stir in the kale, making sure it’s mostly submerged, and cook until tender, 5 additional minutes. Discard the bay leaves. Squeeze the lemon half into the stew and double check the seasoning, adjusting with salt and pepper if necessary. Serve in bowls garnished with the chopped parsley.
Recipe Notes
Finish with olive oil. You can add some cooked small pasta or rice to the finished dish. Freezes well.
You can add 2 cups of cubed chicken or lean ground beef with the chickpeas and braise for 10 to 15 minutes longer if you desire a heartier dish.
Roasted salmon (oven 14 minute at 350 degrees) would be delicious as well.
Recipe by Silvia Baldini — With sharp Pecorino melted on crispy, bitter florets with tender stalks, this is broccolini heaven. It’s a great everyday dish but it’s also worthy of any dinner party.
Recipe by Silvia Baldini — With sharp Pecorino melted on crispy, bitter florets with tender stalks, this is broccolini heaven. It’s a great everyday dish but it’s also worthy of any dinner party.
Special Equipment: Parchment paper.
Preheat the oven to 425°F.
Cut the trimmed broccolini stems in half lengthwise. Don’t cut the florets. Place the broccolini on a baking sheet lined with parchment paper. Drizzle the olive oil on the broccolini and sprinkle with the salt and pepper. Toss well, making sure the broccolini is lightly coated with oil. Spread the broccolini in one layer and roast for 10 minutes, turning once, until crisp-tender\ and slightly browned at the edges.
Sprinkle the Pecorino over the roasted broccolini and return to the oven for 3 to 4 minutes, just until the cheese melts. Squeeze ½ a lemon over the baking sheet, taste for seasonings, and serve hot.
Recipe by Silvia Baldini — My aunt Antonella, an accomplished cook, made lasagne with basil pesto on Sunday family dinners. She would layer pasta sheets, homemade pesto and creamy béchamel in a large ovenproof baking dish the night before our meal. We would top the lasagne with abundant Parmesan and toasted pine nuts before warming them up for 20 minutes, right before sitting down to eat. Zia Antonella taught me to never cook pesto, but to only gently warm it up, because if you cook pesto, you kill the basil and destroy the aroma.
I make my lasagne following her teachings. I layer no boil, flat lasagne noodle (they work great) with small chunks of precooked potatoes and chopped green beans with spoonful’s of béchamel sauce and pesto. I warm the lasagne for 20 minutes, then I broil the top for 3 or 4 minutes until golden brown and bubbly.
2largeYukon gold potatoes, peeled and cut in 2 inches cubes
2cupsgreen beans, stemmed and chopped in 2 inches sections
2tablespoonsextra virgin olive oil
1boxno boil flat lasagna noodles(about 16 sheets)
½ cuppine nuts, toasted
1 ½cupsfreshly grated parmesan
Servings: people
Instructions
Make the pesto:
Put the basil, the parsley, and the Parmesan in a blender. Add half of the olive oil. Pulse until blended in a paste. With the motor going slowly add the remaining oil, the pine nuts, and the vinegar. Blend for 30 to 50 seconds or until combined. The Pesto should be bright green Taste and season with salt and pepper. Set aside.pepper. Set aside.
Make the Béchamel sauce:
Warm the milk with the nutmeg and the bay leaf in a heavy bottom saucepan. Remove from heat right before the milk comes to a boil. Discard the bay leaf and set aside.
In a medium size heavy bottom pan melt the butter on medium low heat, then add the flour. Mix quickly until a paste form.
Add the warm milk to the butter mixture and constantly cook, stirring with a wooden spoon on low heat until the sauce thickens, about 15 minutes. It should resemble sour cream. Add salt and pepper. Set aside. I place kitchen film right on the top to avoid a skin to develop.
Make the lasagne:
Preheat the oven at 350 ° F. Lightly oil the oven proof dish.
Boil 2 cups of salted water in a medium pot. Parboil the cubed potato for 5 to 7 minutes, until soft but al dente. Scoop the potato out with a slotted large spoon and place in medium bowl. Toss with a teaspoon of olive oil to avoid sticking.
Add the green beans to the boiling water and blanche for 4 to 5 minutes until bright green and cooked al dente. Scoop the beans with the slotted spoon and toss with the potatoes. Set Aside.
Assemble the lasagne:
Cover the base of the oven proof dish with a scoop of pesto and a scoop béchamel. Place 3 sheets of the lasagna noodle and cover the whole bottom of the pan.
Scoop 2 tablespoons of pesto and two tablespoons of béchamel sauce on the noodles. Flatten with a rubber spatula and cover the whole surface. Add 3 tablespoons of the cooked potatoes and green beans, then sprinkle a handful of pine nuts and 2 or 3 tablespoons of the grated Parmesan. Flatten the mixture with the rubber spatula making sure to distribute evenly. Season with salt and pepper. Reserve a couple of tablespoons of pesto to decorate the baked lasagne
Repeat this pattern until everything is used up and there is a layer of bechamel on the top. Sprinkle with the Parmesan and some pine nuts.
Transfer to the oven and bake for 25 to 30 minutes until golden brown and bubbly on top. You can use the broiler for the last 3 minutes but be careful not to burn the béchamel.
Remove from the oven, swirl the reserved pesto on the top. Rest for at least 10 minutes and serve.
Recipe by Silvia Baldini — This beloved Italian dish appears often at my dinner table. The veal is thin and tender and coated in bread crumbs before being cooked until golden and crunchy. I love a good cotoletta with lots of lemon squeezed over the top at the last moment to brighten each bite.
It’s also my children’s favorite meal, often accompanied by a heap of roasted potatoes and a peppery arugula salad.
2veal cutlet steaks (sliced shoulder or top round), about ½-inch thick
1Largeegg, lightly beaten
3cupsall-purpose flour
4cupsplain dried bread crumbs
1Vegetable oil, for frying
1mediumlemon, quartered lengthwise
Servings:
Instructions
With a sharp knife, trim the veal cutlets. Put the cutlets between two pieces of waxed paper and flatten with a mallet. Use a sharp knife or kitchen shears to make a small snip along the edges of each cutlet to prevent the meat from curling when cooking. Season both sides with salt and pepper.
Line up 3 shallow dishes, adding the flour to the first bowl, the beaten egg to the second and the bread crumbs to the third. Working in batches, dip each cutlet first in the flour, then in the beaten egg and finally in the bread crumbs, ensuring both sides are fully coated before moving on to the next. Press the bread crumbs firmly into the cutlet and gently shake off any loose extra crumbs.
Heat a large, heavy-bottomed frying pan and heat on medium-high until small bubbles come up when a small pinch of bread crumbs is dropped in. Working in batches if necessary, fry the cutlets, turning once halfway through, until golden brown on both sides, for 3-5 minutes total.
Transfer the fried cutlets to a platter lined with paper towels and let any excess oil drain off. Serve hot with an extra sprinkle of salt and the lemon wedges on the side for squeezing.
Recipe Notes
Double the recipe and use the leftovers to make a killer sandwich. Add a dollop of mayonnaise or tartar sauce and use toasted sesame buns.
You can simmer the fried cutlets in Marsala wine or balsamic vinegar as a variation.
Recipe by Silvia Baldini—Spatchcocking, or butterflying, a chicken means cutting out its backbone and opening it like a book so that it lies flat while cooking. It ensures that the chicken will cook quickly and evenly and turn a uniform brown with perfectly crispy skin.
When smothered in mustard and marinated overnight with garlic, lemon and a large bunch of parsley, this chicken grills to perfection and tastes superlative without doing too much work. You can splash the cooked chicken with a quick balsamic vinaigrette like I do or serve it just the way it is. Either way, it’s delicious.
Ask your butcher to spatchcock the chicken for you, but it’s not a hard thing to do yourself. I use my sharp kitchen shears and I cut alongside the backbone, from one end of the bird to the other. Then I cut along the other side of the backbone to remove it completely and then I flatten the whole bird evenly with the palm of my hands.
Happy BBQ season!
2large lemons (1 lemon for 1 teaspoon grated zest and 2 tablespoons of juice; and 1 lemon for slicing)
2mediumgarlic cloves, minced
2tablespoonsextra virgin olive oil
1bunch fresh flat Italian parsley
14 ½- to 5-lbwhole chicken, spatchcocked
Balsamic Vinaigrette
½cupwater
½cupfreshly squeezed lemon juice
1teaspoongranulated sugar
¼cupdark aged balsamic vinegar
2tablespoonsextra virgin olive oil
1bunchbunch fresh flat Italian parsley, finely chopped
¼teaspoonfine sea salt
¼teaspoonfresh ground black pepper
Servings: people
Instructions
In a small bowl, combine salt, pepper, mustard, lemon zest, lemon juice, minced garlic and 1 tablespoon of olive oil.
Rub this mixture generously all over both sides of the chicken. Place the chicken skin-side up in a rimmed and lined baking sheet and top with parsley and lemon slices Cover tightly and store in the refrigerator to marinate for at least 1 hour or up to 24 hours.
When you’re ready to cook, remove the chicken from the fridge and let it stand on the counter for 30 minutes. Preheat the grill or oven to 475°F.
Uncover the chicken, drizzle with 1 tablespoon of olive oil and cook, skin side up, for 20 to 25 minutes.
While the chicken is cooking make the vinaigrette. In a small pan, combine the the water, lemon and sugar, then bring to a boil. Turn down the heat and add the balsamic vinegar. Cook for 5 to 8 minutes, or until thick and slightly reduced.
Turn off the heat and whisk in olive oil, parsley, salt and pepper and set aside.
Flip the chicken skin side down and cook for another 20 to 25 minutes, until the meat is cooked through and the skin is very crispy and brown all over but not burned.
Transfer the chicken to a cutting board to rest. Drizzle the chicken with a couple of tablespoons of the vinaigrette. Carve and serve with the remaining vinaigrette.
Recipe Notes
If you like, you can skip the vinaigrette and just serve the chicken as is or with a generous splash of balsamic vinegar.
Grilled fresh figs or halved peaches make a lovely addition
Recipe by Silvia Baldini — A slow-cooked pot roast will provide an excellent Sunday dinner and provide leftovers for easy weekday sandwiches, pasta sauces, and soups. I marinate my pot roast in red wine for an intense flavor and cook it with a bunch of vegetables and fresh herbs for richness and depth. Once the meat is fork tender, I like to blend the vegetables and juices into a sauce to serve with the sliced meat. It’s a delicious heartwarming meal. Whether you cook it in the oven or use the stovetop, Instant Pot, slow-cooker or pressure cooker, the results are guaranteed the same.
Recipe by Silvia Baldini — A slow-cooked pot roast will provide an excellent Sunday dinner and provide leftovers for easy weekday sandwiches, pasta sauces, and soups. I marinate my pot roast in red wine for an intense flavor and cook it with a bunch of vegetables and fresh herbs for richness and depth. Once the meat is fork tender, I like to blend the vegetables and juices into a sauce to serve with the sliced meat. It’s a delicious heartwarming meal. Whether you cook it in the oven or use the stovetop, Instant Pot, slow-cooker or pressure cooker, the results are guaranteed the same.
4lbboneless beef rump or top round in one piece, tied together with butcher string
salt and fresh ground black pepper
¾cupred wine
1clovegarlic,peeled
2cupsroughly chopped onions
1cuproughly chopped carrots
1cuproughly chopped celery
1tablespoonextra virgin olive oil
2tablespoonstomato paste
¼teaspoongrated nutmeg
1stickcinnamon
3 ½cupsbeef or veal stock
1sprigfresh thyme
1bay leaf
1sprigfresh rosemary
¼cupCognac or brandy (optional)
3tablespoonsheavy cream (optional)
Servings: people
Instructions
In a large bowl, season the beef well on all sides with salt and pepper. Add the wine, garlic, and ½ cup each of the onions, carrots and celery. Cover and refrigerate for at least overnight but no more than 16 hours.
The next day, about 3 hours before you want to sit down to dinner, preheat the oven to 350°F.
Remove the meat from the marinade, reserving the marinade. Pat the meat dry on paper towels. In a heavy 3-quart Dutch oven, medium-high heat the oil. Add the beef and brown on all sides.
Transfer the beef to a plate. Add the remaining onions, carrots and celery to the Dutch oven, reduce the heat to medium-low and cook until tender and lightly browned.
Stir in the tomato paste, nutmeg and cinnamon.
Add the stock and reserved marinade and bring to a simmer, scraping the bottom of the pan to incorporate any browned bits. Add the thyme, bay leaf and rosemary. Season with salt and pepper to taste. Return the meat to the casserole.
Cover the Dutch oven and place in the oven. Bake for about 2 hours, until the meat is fork tender.
Remove the meat from the casserole and cut it into thick slices. Arrange the slices on a platter and cover with foil to keep warm while you prepare the sauce.
Discard the herb sprigs, bay leaf and cinnamon stick. Blend the sauce right in the Dutch oven with an immersion blender until the desired consistency.
Add the Cognac and cream, if desired, and simmer the sauce for a few minutes. Check the seasoning and adjust with salt or pepper if needed.
To serve, spoon some of the blended sauce over the sliced roast beef and pass the remaining sauce alongside. (Alternatively, the roast beef can be refrigerated overnight in the cooking liquid, and the next day the meat can be sliced, and the sauce blended and reheated before serving. Doing this will improve both the flavor and texture of the meat and will also allow the layer of chilled fat on the surface of the liquid to be removed and discarded.)
Recipe Notes
For a more complex flavor, upgrade your red wine to a Barolo is a wine from the Piedmont region and it’s used during the holidays for cooking a fancier version of pot roast called Brasato
Recipe by Silvia Baldini — One dish I like to do during the holidays is Prosecco risotto with either scallops or lobster. Firstly because scallops and lobsters are so plentiful in winter here in New England, but also because prosecco, the fizzy white wine of north-eastern Italy, is a lovely, light drink that is perfect for a celebration.
The combination of smooth, velvety scallops or sweet lobster, fruity, tangy prosecco and starchy rice is wonderful.
1bottle Prosecco, you don't need that much for the dish, but this means you can have a glass while you're cooking
4cupshot fish or vegetable stock
1/2lemonjuice
fine salt and freshly ground black pepper
Servings: people
Instructions
Cut 12 thin (about 1/4 inch thick) slices of scallop for garnish, then dice the rest of the meat, including the corals. Melt 3 tablespoons of the butter in a large, heavy-based pot, add the onion and cook gently until translucent.
Add the rice and stir to coat. Add 120ml or a generous glass of prosecco, let the alcohol evaporate , then add a little stock, stirring all the while - you don't want to let the rice get too wet.
When the liquid has been absorbed, add another ladle of stock, and stir. Repeat for 15-17min, until the rice is soft, but al dente.
Turn down the heat and stir in the reserved tablespoon of butter and then the diced scallops, lemon juice and seasoning. Spoon into bowls and, just before serving, season the reserved scallop slices and place two on top of each dish - the heat of the rice will cook them straight away.
2large garlic cloves, peeled, green shoots removed, thinly sliced
1mediumlemon rinds in strips
1large orange rinds in strips
1tablespoonfresh thyme leaves, coarsely chopped
1tablespoonchopped fresh rosemary
1/2teaspoonfennel seeds
2cupsimported olives (black, green or a mix) (about 3/4 pound)
Servings: cups or 12 servings
Instructions
Combine the olive oil, vinegar, bay leaves and garlic in a small saucepan and heat just until warm over low heat. Remove from the heat and stir in the lemon rind, thyme, rosemary and fennel seeds.
Place the olives in a wide mouthed jar and pour in the olive oil mixture. Shake the jar to coat the olives. Refrigerate for two hours or for up to two weeks. Shake the jar a few times a day to redistribute the seasonings.
Tip: Advance preparation: These will keep for about two weeks in the refrigerator.
The secret to a good homemade crispy crust is 00 flour. It is more than a secret. 00 flour, is the first commandment for making Italian pizza. During the rest, the dough's gluten is strengthened enough for the crust to support the toppings and to yield a great crispy bite but still have a tender crumb.
The secret to a good homemade crispy crust is 00 flour. It is more than a secret. 00 flour, is the first commandment for making Italian pizza. During the rest, the dough's gluten is strengthened enough for the crust to support the toppings and to yield a great crispy bite but still have a tender crumb.
Mix the sugar and the yeast in a small container then add one teaspoon of the water.
Put all the ingredient in a Kitchen-Aid bowl. Use a dough hook and work the dough for 5 to 7 minutes on high, until smooth.
Take the dough out of the metal bowl, form a ball and place on a wooden board. Cover with a glass bowl and proof for one hour. I like to proof in a warm space, usually in my turned off oven.
Have you ever had Tigelle? They resemble an English muffin. They are the ultimate happy family dinner. Cut, stuff, enjoy. Prosciutto, mortadella, soft farm cheese, salame, rucola...endless pleasure. Did I mention Nutella?
Have you ever had Tigelle? They resemble an English muffin. They are the ultimate happy family dinner. Cut, stuff, enjoy. Prosciutto, mortadella, soft farm cheese, salame, rucola...endless pleasure. Did I mention Nutella?
Dissolve the yeast in the warm milk. The milk should be warm to the touch.
In a large bowl, add the flour and salt. Add the eggs and milk with yeast, the melted butter and stir gently. I like to start the initial process in a bowl and finish by kneading the dough on a pastry board.
Work and kneed the dough by hand.
Add additional tablespoons of milk if needed, until you get a somewhat smooth, workable dough.
Shape into a smooth ball and cover with a glass bowl for about one hour or until doubled in size.
Tip the dough out onto a floured surface and roll out to I/4 of an inch thick. Use a small cutter to cut into neat discs. Re-roll out trimmings and cut out more circles until all the dough is used.
Carefully arrange the discs onto a tray lined with greaseproof paper. Cover with a cloth and leave to proof for another hour.
Place a nonstick frying pan over a medium-high heat and allow to come to temperature. Cook the tigelle for about 4 minutes each side until puffed up and slightly charred. Or Use and Arepa maker if you own one!
Slice open and stuff with an array of cured Italian meats or cheeses.
A terrine is just the name of the beautiful earthware dish it is served in. Terrines are often artistic and versatile, a little old fashion but always beautiful. A terrine is a sociable dish because it's prepared in advanced and it can be sliced and served while you chat. This pressed tuna terrine, layered with avocados and softly cooked potatoes is stunning but also simple to make and bursting with mediterranean flavors. It's best prepared the day before and chilled in the refrigerator overnight.
A terrine is just the name of the beautiful earthware dish it is served in. Terrines are often artistic and versatile, a little old fashion but always beautiful. A terrine is a sociable dish because it's prepared in advanced and it can be sliced and served while you chat. This pressed tuna terrine, layered with avocados and softly cooked potatoes is stunning but also simple to make and bursting with mediterranean flavors. It's best prepared the day before and chilled in the refrigerator overnight.
Line a 1.5 quarts capacity terrine with plastic wrap. Leave some of the wrap overhanging. I like to lightly wet the edges of the terrine with a brush so that the wraps will adhere well to the sides.
Peel the avocado and cut in 8 wedges lengthwise and set aside covered with lemon juice to prevent browning.
Slice the tuna in half of an inch steaks and chargrill each side for about a minute in a grill pan. Make sure the tuna remains very pink inside. Season with salt and pepper.
Peel the potatoes and cook in salted boiling water until tender but firm. Drain and cut into 4 while still warm. Stir in to the melted butter and add the chopped cilantro.
Slice the eggplant on a mandolin in to thin slices lengthwise. Drizzle with olive oil. Grill the slices in a hot grill pan until slightly transparent. Lay the grilled eggplant slices on the cling film in the terrine Cover all the sides and leave some overhanging. It will help wrap the terrine. If you have enough reserve a couple of extra slices to complete the terrine once you have layered all the ingredients.
Build layers with all the prepared ingredients. Start with potatoes, then tuna, avocado and keep going until all the ingredients are used. Try to finish with a layer of tuna. Remember to season with salt and pepper in between the layers and lemon juice. Press as you go. You don't want any pockets of air or empty spaces.
Wrap the last layer of tuna with the overhanging eggplants and the reserved slices of eggplant. Close with plastic wrap.
Chill for at least 6 hours in refrigerator. When ready to serve gently pull the plastic wrap up and lift the terrine out on to a plate. Slice with a sharp knife and serve with toasted bread.
Recipe by Silvia Baldini — I spent many springs and summers helping my grandmother freezing spinach. We would tightly pack the freezer with as many spinach balls as we could and then enjoy them during winter. Blanching spinach before freezing helps preserve the color and taste for longer and it helps retaining the nutrients and it means that it will last a lot longer in the freezer, for up to a year.
I use the spinach in soups, smoothies or simply tossed with lemon and olive oil.
Bring a large pot of boiling water to the boil. Add pre-washed leaves to the boiling water.
Stir and cook at a rolling boil for two minutes.
Transfer the leaves to a basin or large bowl of iced water. Keep the spinach submerged for another two minutes in the cold water to halt the spinach from cooking more.
Dry the spinach and then squeeze all the water out by pressing with your hands.
Shape the spinach in tight balls.
Pack the spinach balls into freezer bags or vacuum pack them. Then seal and freeze.
Recipe by Silvia Baldini and Augusto Baldini — My son and I make Sunday family meals together, often. I cherish the time we spend cooking in the kitchen. Every second is precious to me. This pork shoulder is slow cooked for at least 8 hours at a very low temperature, and believe you me it comes out a masterpiece. The meat melts in your mouth, while the fat is rendered crisp and magnificently delicious. We often use a whole pork shoulder (eleven-twelve pounds of pork and scale up the recipe) We put it in the oven for the all night on a Saturday, then on Sunday morning we have family and friends over and feast on it. It's what life is about.
Recipe by Silvia Baldini and Augusto Baldini — My son and I make Sunday family meals together, often. I cherish the time we spend cooking in the kitchen. Every second is precious to me. This pork shoulder is slow cooked for at least 8 hours at a very low temperature, and believe you me it comes out a masterpiece. The meat melts in your mouth, while the fat is rendered crisp and magnificently delicious. We often use a whole pork shoulder (eleven-twelve pounds of pork and scale up the recipe) We put it in the oven for the all night on a Saturday, then on Sunday morning we have family and friends over and feast on it. It's what life is about.
1tablespoonfive spice powderFive Spice Powder is a blend of cinnamon, cloves, fennel, star anise, and Szechwan peppercorns.
1 1/2teaspoonsfine sea salt
one 8 poundsboneless, skinless pork shoulder
1 1/2cupsorange juice
Servings: people
Instructions
Preheat the oven at 450F(230C)
Combine the ginger, garlic, maple syrup, soy sauce, five-spice powder and salt in a small bowl. Mix well.
Pat the pork shoulder dry with paper towels. Rub the pork all over with the spice mixture. Put the pork in a roasting pan or Dutch oven, fat facing up.
Pour the orange juice in the roasting pan around the shoulder and place in the oven.
Roast for 30 minutes to brown the shoulder.
Lower the temperature to 265F(130C) and roast for 8 hours or more. Open the oven and baste the pork once in a while with the juices.
Pull the pork out of the oven. Use tongs or two forks and shred the meat and stir it in to the juices and fat at bottom. Serve with buns or lettuce leaves.
Recipe by Silvia Baldini — I’m a big fan of boeuf bourguignon. I learned to make it as child from my mom, and later I perfection it while training at Cordon Bleu. Of course Julia Child's boeuf bourguignon is a classic, however I have adapted her recipe and I use short ribs instead of stew meat. I slow cook the ribs for at least 3 hours in the oven until fork tender. They come out melt in your mouth delicious every time. Boeuf bourguignon is one of my go to dishes when I need to feed a large crowd in winter. I always make it one or two days in advance because it taste better after all the flavors mingle while resting for at least 24 hours.
The secret of a good boeuf bourguignon is patience and very slow cooking. I sear the ribs to a brown crisp before slow cooking them. I sear two or three ribs at the time and then I drain them from the extra fat. I also like to braise cipolline (small sweet onions) separately and add them at the last moment as a garnish; they bring a smooth texture to the stew.
At the beginning of the process take your time to cook each ingredient properly, and you will be happy by the results.
Boeuf bourguignon is a braise. Braised meat is essentially a piece of meat that is browned on all sides, and then cooked gently in liquid. You want to do this in a large pot that is oven-friendly, since there is no better way to ensure even, low, gentle cooking than by placing the entire vessel in the oven at a low temperature. Pay attention to the bottom of the pan while you are cooking. As you sear, little pieces of meat will brown and stick to the bottom. The French call these golden suc, tiny bits of flavor for sauce. The best way to scrape up these little flavor bombs is with wine. Use a glass of wine, some good homemade stock, or even water and scrape all the bits of the bottom then reduce before doing the ingredients. This will gift your bourguignon (or any braised dish) with the foundation for layers of flavors.
5poundstrimmed boneless beef short ribs, cut into 2 1/2-inch pieces
6mediumcarrots—4 cut into 2-inch pieces, 2 cut into 1-inch rounds
4mediumcelery ribs, cut into 2-inch pieces
2mediumgarlic cloves
1750-milliliter bottle dry red wine
fine sea salt
freshly ground pepper
1/4cupextra virgin olive oil
6cupsbeef stock
1poundmeaty slab bacon—half cut into 1/4-inch-thick lardons, half cut into 2-in
3bay leaves tied with 10 thyme sprigs, one sprig of rosemary
2poundsstemmed button mushrooms
1poundpeeled cipolline
1bunchchopped flat-leaf parsley, for garnish
Servings: people
Instructions
Place the short ribs, 2-inch carrot pieces, celery, onions, garlic and red wine in a large bowl and marinate for at least 4 hours or refrigerate overnight.
Preheat the oven to 325°. Strain the beef and vegetables over a bowl; reserve the wine.
Separate the short ribs from the vegetables. Pat the meat dry and season with salt and pepper. In a large enameled cast-iron casserole, heat the olive oil. In batches, sear the meat over high heat until browned on all sides, 30 minutes; transfer the meat to a bowl as you go.
Reduce the heat to moderate, add the marinated vegetables and cook until softened, 8 minutes.
Add the reserved wine, stock, large bacon pieces, herbs and meat along with any juices; bring to a simmer.
Braise the stew in the oven for 3 1/2 hours, until the meat is fork tender.
Using a slotted spoon, transfer the meat and bacon to a bowl. Strain the liquid, discarding the solids.
Wipe out the casserole. Add the lardons and crisp over moderately high heat, 10 minutes; transfer to paper towels. Working in batches, add the mushrooms to the casserole and cook until golden, 8 minutes per batch. Add the mushrooms to the meat.
Add the carrot rounds and braising liquid to the pot and simmer until the liquid is reduced by one-third. Add the meat, bacon, lardons and mushrooms; simmer until the sauce reduces slightly. Season with salt and pepper and let cool. Refrigerate overnight.
Braise cipolline until tender in a medium pan with a tablespoon of olive oil and 4 tablespoons water . Season with salt and set aside.
Skim the fat from the stew and reheat. Garnish with braised cipolline, parsley and serve.
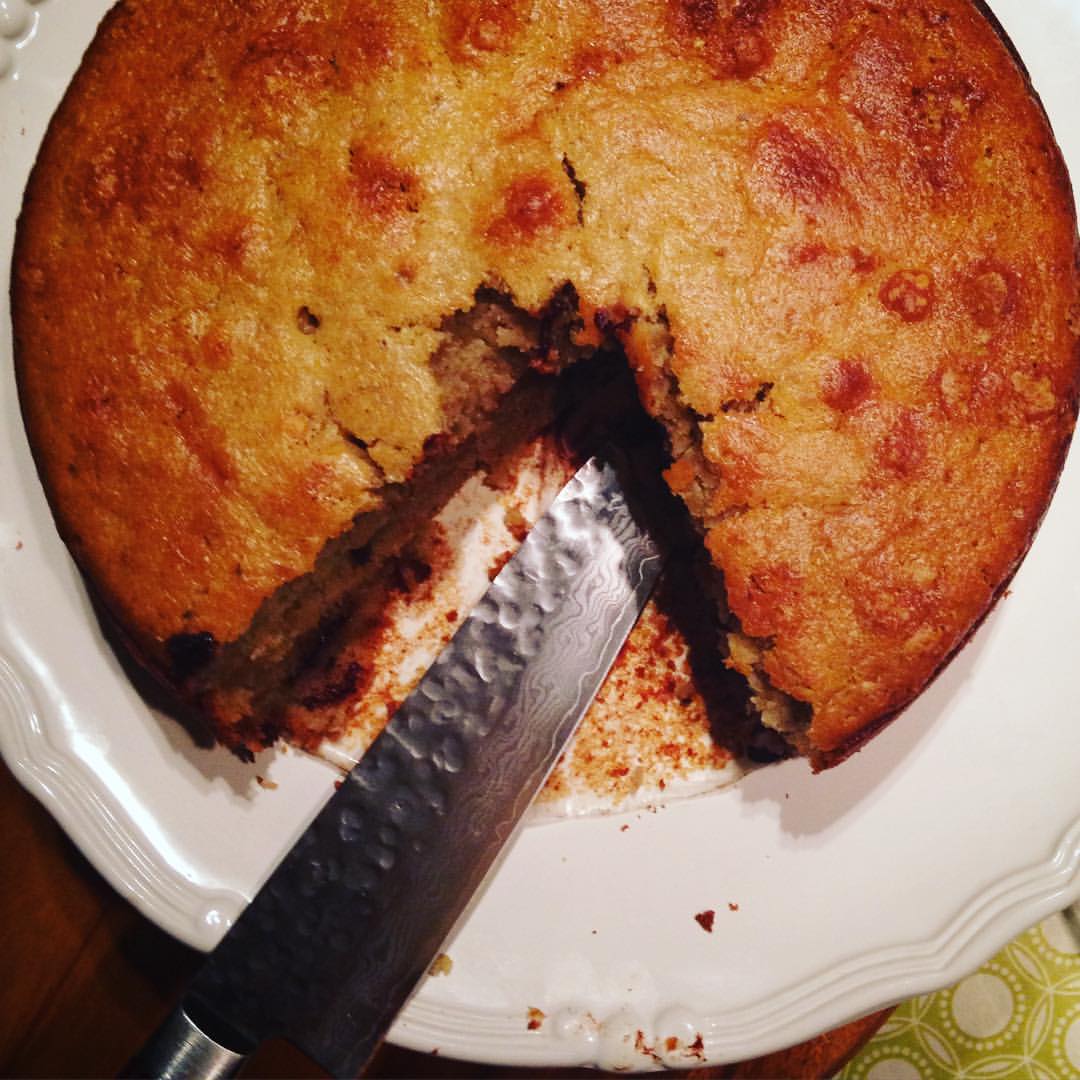
Recipe by Silvia Baldini — When life gives you too many bananas you make gooey chocolate, coconut and rum cake. 20 minutes to make, one hour to bake. Eat warm out of the oven with a large scoop of bourbon vanilla ice cream or caramel crunch would be nice too.
Recipe by Silvia Baldini — When life gives you too many bananas you make gooey chocolate, coconut and rum cake. 20 minutes to make, one hour to bake. Eat warm out of the oven with a large scoop of bourbon vanilla ice cream or caramel crunch would be nice too.
1 1/2cupmashed ripe bananas4 bananas with brown spots
2cupsall-purpose flour300g
1/2cupshredded desiccated coconut50g
2tspbaking powder
1/2tspbicarbonate (baking) soda
1/4tspsalt
1 1/4stickunsalted butter softened150g
1 1/4cupcaster granulated sugar225g
1/2tspvanilla extract
2tablespoons rumoptional
3largeeggs
3 1/2ozdark chocolate finally chopped100g
Frosting
7ozdark chocolate200g broken in to pieces
3/4cupicing confectioner sugar160g
1/2cupsour cream225ml
Servings: people
Instructions
Cake
Heat the oven to 150c/325f
Butter a 9 1/2 inch-24cm spring form cake pan and line with baking parchment.
Place the milk and lemon in a bowl and let stand for 10 minutes to sour the milk, then stir in the mashed bananas.
Stir together flour, desiccated coconut, baking powder and baking soda with the salt. With a stand in mixer or by hand, beat together butter, sugar and vanilla until light and fluffy. Beat eggs one at the time. Add the Rum if using. Add one-third of the flour mix to the creamed mixture and gently beat in. Add one-third of the banana mixture and gently beat in. Alternately add the remaining flour and banana until combined. Gently fold in the chocolate. Spread the batter over the base of the lined spring form.
Bake for 1 hour and 10 minutes, until the sides have pulled away from the spring form. Transfer to a wire rack and leave to cool for 15 minutes before turning out on the rack and leaving to cool completely.
Frosting/ Optional
Melt the chocolate in a bowl over a pan of simmering water. Stir until smoothly combined. Cool slightly. Gradually beat in the icing sugar. Stir in the sour cream until thick, smooth and glossy. Use immediately.
Recipe Notes
The frosting is very good and very festive but not necessary. I like this cake plain most of the times.
You can substitute half of the dark chocolate with the same amount of white chocolate for a truly decadent treat.
Use good quality chocolate it makes a difference.
The bananas need to be very ripe with brown speckled skins to achieve perfect flavor and texture.
Recipe by Silvia Baldini — Eggplant Parmigiana is one of my family go-to Sunday meals. This recipe is my version of the Italian classic and it's a lighter and vegetarian option. The eggplants are sliced and grilled instead of fried and then layered with either uncooked, canned crushed Italian tomatoes or with with a simple cooked sauce. I like to use a generous amount of good olive oil, a lot of fresh basil, and smoked mozzarella for extra flavor, but fresh unsalted mozzarella is always a great alternative. To make the sauce I cook the crushed tomatoes with a peeled garlic clove lightly sautéed in a couple of tablespoons of olive oil. I bring the tomatoes to a boil and then I simmer them for 15 minute with a bunch of basil leaves or until the extra liquid is reduced. I end by always removing the garlic clove and I season with a little salt and little pepper.
Recipe by Silvia Baldini — Eggplant Parmigiana is one of my family go-to Sunday meals. This recipe is my version of the Italian classic and it's a lighter and vegetarian option. The eggplants are sliced and grilled instead of fried and then layered with either uncooked, canned crushed Italian tomatoes or with with a simple cooked sauce. I like to use a generous amount of good olive oil, a lot of fresh basil, and smoked mozzarella for extra flavor, but fresh unsalted mozzarella is always a great alternative. To make the sauce I cook the crushed tomatoes with a peeled garlic clove lightly sautéed in a couple of tablespoons of olive oil. I bring the tomatoes to a boil and then I simmer them for 15 minute with a bunch of basil leaves or until the extra liquid is reduced. I end by always removing the garlic clove and I season with a little salt and little pepper.
2large eggplants, sliced into 3/8 to 1/2 inch thick rounds
4tablespoonsextra virgin olive oil
116-ounces cancrushed Italian tomatoes
1cupParmigiano Reggiano
8ouncessmoked mozzarella sliced thin
1large bunch bunch fresh basil leaves
salt and pepper
Extra Virgin Olive Oil for finishing
butter unsalted
Servings: people
Instructions
Preheat the oven to 350°F.
Slice the eggplants into thin rounds. Brush each slice lightly on both side with the olive oil.
Put a grill pan on high heat. Get the pan hot.
Grill the eggplant slices on both sides and until soft. Make sure to get even grill marks. Brush again lightly with olive oil and adjust the seasoning. Set aside.
Grease an 8 x 8 inch baking dish with olive oil. Spread 2 tablespoons of tomato on the bottom of the dish.
Line the bottom of the dish with the grilled eggplant in a single layer. Spread a little less than 1/3 of the tomatoes over the eggplant. Make a layer of smoked mozzarella and sprinkle a liberal amount of Parmigiano Reggiano over it. Place a few torn pieces of basil over this layer.
Continue making layers with the eggplant, tomatoes, mozzarella, Parmigiano, and basil until you have used up the eggplant. Skip the basil on the top layer.
Dot the top layer with some unsalted butter and sprinkle with Parmigiano. Place the dish into the upper third of the preheated oven.
Cook for about 35 minutes. The eggplant should be bubbling and the mozzarella nicely melted.
Allow to rest and settle for about 5 minutes before slicing and serving.
Recipe by Silvia Baldini — Bring some zing to your autumn and winter cooking with a squeeze of citrus in this creamy bowl of spaghetti topped with briny and sweet oysters.
I’m using lemons in this ridiculously simple and comforting pasta dish, but limes would work well too. The creamy base is a simplified beurre blanc that plays well with the sharpness of the lemon, the texture and taste of the capers and with the crunchiness of the breadcrumbs.
You can also substitute the oysters with shrimps, clams or squid or omit the seafood completely and enjoy this incredibly bright and creamy pasta on its own.
1/2cupsourdough toasted breadcrumbsany old crusty bread will do
2tablespoonsextra virgin olive oil
sea-salt
Servings: people
Instructions
In a small pan over medium heat mix the shallots with the wine and a splash of water. Simmer down until almost no liquid is left. Whisk in the butter, one cube at the time to create a smooth custard like emulsion, whisk in the lemon juice and the zest and season with salt. Keep warm.
Shuck the oysters. Place a shallow pan on medium heat. Add the liquor from the oysters and ¼ cup of water, bring to a boil then reduce to a simmer. Gently put the shucked oysters in the liquid and poach for 1 minute until the sides gently curl. Drain and set the oysters aside.
Heat a frying pan on a medium-high flame, then tip in the breadcrumbs and fry, tossing or stirring regularly, for seven to 10 minutes, until golden and crisp.
Meanwhile, bring a large pan of salted water to a boil and cook the spaghetti until al dente. Drain, then toss with the lemon sauce, the capers and the flat leaf parsley. Serve at once topped with the toasted and fried breadcrumbs and the steamed oysters.
Crispy, crunchy, polenta cookies. The recipe was kindly gifted to me by my MIL Elisabetta.
They have become a welcome tradition in my family. We make them a couple of weeks ahead of the holidays and keep them fresh in a metal tin, lined with parchment paper. The mix of polenta and potatoes starch gives them a melt in your mouth texture. I like to dust them with a light coating of powder sugar and I enjoy them as treat with tea or when my sweet tooth requires a fixing.
In a bowl, mix together the polenta, flour, potato starch, almonds, baking powder and salt.
In a mixer, cream together the butter and sugar. Add the eggs one by one, then add the lemon and the vanilla. Add the dry ingredients and mix until a firm dough forms.
Divide the dough in half, place each piece onto a piece of parchment or wax paper, Cover with another piece of parchment and roll out both pieces with a pin in to two 1/4 inch thick rectangles.
Refrigerate at least 1 hour.
Preheat the oven to 350 degrees F, and line 2 cookie sheets with parchment paper or silicone baking mats.
Cut the cookies with small shaped cookie cutters.
Place on the prepared cookie sheets about 2 inches apart. Bake, rotating the cookie sheet halfway through, until cookies are just golden, 10 to 12 minutes. Transfer to a rack to cool completely, about 20 minutes.
Dust with powder sugar.
Polenta cookies can be stored in an airtight container for up to 3 weeks.
Recipe by Silvia Baldini — Italian hot chocolate is thicker, creamier, and generally much richer than traditional American hot chocolate, which is less dense and milkier. It is made with a few key ingredients: cocoa, sugar, and milk. A little dark chocolate and a thickening agent, such as cornstarch, are added as well. I like to add flavors to my chocolate. Vanilla or coffee are
great additions. Nutella and marshmallows make a great halloween treat and a dash of orange liquor or rum give it an adult twist.
Chop the dark chocolate into very small pieces. Place the milk on low heat.
In a bowl mix together cocoa, cornstarch (or potato starch), and powdered sugar. When the milk is hot, but well before it starts to boil, add the mixture and start stirring, always in the same direction, avoiding the formation of lumps.
Once bubbles start to form on the surface, add the chocolate and mix until thick and creamy. But beware: the starch will cause it to thicken even when removed from heat, so it's a good idea to remove the chocolate from the heat before it thickens completely (otherwise you run the risk of turning it into a pudding!)
Pour it into four mugs and serve it warm.
Recipe Notes
Make sure the milk is warm before you start adding the other ingredients.Keep the heat on low and be careful of burning the bottom.
Do not allow the chocolate to thicken too much before removing it from heat.
If chocolate clumps start to form, remove the mixture from heat and whisk vigorously until it is smooth again.White chocolate can be used instead of dark chocolate
The chocolate can be flavored with vanilla, cinnamon, coffee, nutella, orange liquor, peppermint, rum
Peaches and warm biscuits with Amaretto whipped cream are the celebration of summer flavors and they require minimal effort.
To make this heavenly dessert I drench sliced white peaches in lemon and sugar. I add a couple of teaspoons of Amaretto liquor, then I set them aside to macerate. I usually don’t peel my peaches; I use a cloth to remove the fuzz.
It takes less than 15 minutes to make biscuit dough. Use the best fats you can find. I like lard, for its flavor and intensity or European-style butter for its low water content and taste. I work the biscuits with either All-purpose flour or cake flour for a silkier crumb, and I always use cream.
I use a soft touch on the mixing, turning out and patting down of the dough. (Do not fool with a rolling pin. A rolling pin has no place in biscuits.)
Remove the peaches fuzz gently with a cloth. Slice the peaches, remove the pit, and toss them in a bowl with the sugar, the juice of half a lemon, and the Amaretto liquor. Set-asides to macerate.
If you want to skin peaches, cross the bottom with a sharp paring knife, pour boiling water over them. When ripe they will peel after 15-20 seconds.
To make the biscuits line a cookie sheet with baking paper and preheat the oven at 400°F. Sift the flour, the baking powder, sugar and the salt in a large bowl. Add the butter and with your hands or a pastry cutter or a fork work the mixture into a crumbly dough. Add the cream and stir gently until it forms a rough ball.
Turn the dough out onto a lightly floured surface and shape with your hands, not a rolling pin, into a rectangle about 1 inch thick, fold once and gently reshape the rectangle about 6 inches by 10 inches large. Cut the dough into 6 disks with a metal cutter or a small glass. Shape the remaining dough into a disk. Brush the top of the biscuits with cream or milk and sprinkle with sugar.
Place the biscuits gently onto the lined cookie sheet and bake for 10 to 15 minutes until golden brown. Remove from the oven and let them cool.
Whip the cream in a standing mixer until it begins to get stiff, then add the sugar and the Amaretto liquor. Continue to whip until the cream is firm. Do not overbeat the cream or it will turn in to butter.
To assemble cut the biscuits in half and place the bottom of each plate. You can lightly dunk the cut biscuit halves in some of the maceration juices to mop up the extra flavor. Divide the peaches among the biscuits and spoon more of the macerating liquids over pressing a little so the bottom absorbs more juices. Sprinkle the crumbled amaretto cookies on the peaches. Add a generous dollop of whipped cream, dust lightly with the cocoa powder
Top the whipped cream with the biscuit crown and drizzle the remaining juices around the plate.
Recipe Notes
If your peaches are not perfectly ripe and sweet, you can bake them for 15 to 20 minutes after macerating them. Baking the peaches will develop their sugary flavor and soften them. To bake, place them on a lined cookie sheet and dot them with butter, then place them in the oven at 350°F.
Recipe by Silvia Baldini — Barbera is great with grilled meats and it’s best served slightly chilled, making it the perfect BBQ wine not only for drinking but also for cooking.
This Barbera marinade, based on the Italian recipe for brasato, works wanders to flavor flank steak. I marinate the meat for thirty minutes to two hours. For rare steak, I grill it on really high heat for three to five minutes on each side, depending on the thickness. Larger steaks might take longer. I reduce the leftover Barbera marinade in a small pot on low heat, I puree it in to a creamy sauce and I serve on the side of the flank steak.
a few whole cardamom cloves, one cinnamon stick, some juniper berries
1/4teaspoonfreshly ground nutmeg
1handfulmixed fresh herbs such as rosemary, sage, thyme tied together with a string
1cupbeef stock
2tablespoonscold butter, unsalted
1shot cognac
116-24 ouncesflank steak
salt and freshly ground black pepper
one bunch of parsley leaves, chopped
Servings: people
Instructions
Marinade
Sweat the onion, carrot and celery with the olive oil until translucent in medium-large pot.
Add the Barbera wine, the garlic, the bay leaves, the cloves, the cinnamon, the juniper berries, the nutmeg and the tied herbs. Cook on medium heat for about 10 minutes. Add the beef stock and cook for another 5 to 7 minutes.
Remove and discard bay the leaves, cinnamon and rosemary and the thyme stalks. With an immersion blender puree the vegetables and the liquid until smooth. Boil the sauce over medium-high heat, uncovered, until the sauce is reduced and slightly thickened, about 10 minutes. Drop in the butter and swirl it through the sauce until glossy. Add a shot of cognac and reduce it until the alcohol has evaporated, about two minutes. Taste for seasoning, add salt and pepper, if necessary.
It can be prepared a day in advanced. Keep refrigerated until ready to use.
Flank Steak
Season the flank steak on both sides with salt and pepper. Place the steak in the Barbera sauce and turn once or twice, then let sit in the sauce until the grill is hot.
Turn the steak one more time, then place on the grill; brush a couple of tablespoons with the Barbera sauce over it, reserve the rest of the sauce. For rare meat, grill about 3 minutes a side for steaks less than an inch thick. For larger or more done steak, increase the time slightly.
Rest the steak for 10 minutes and slice at a diagonal, against the grain. Serve with the chopped parsley and the reserved sauce on the side.
Recipe by Silvia Baldini — This is the most tender of all cuts of beef but it is less flavorful than those coming from a muscles of animals. I like to unroll the cylinder of the fillet by butterflying it with a sharp knife until I obtain a rectangular shape of even thickness. I cover the surface after a good seasoning with chopped herbs, or chopped bacon, mushrooms, caramelized onions or shallots and cheese, roasted peppers or truffles. I roll up the filet and tie it with kitchen rope then after a good browning on the stove, I finish the filet in a hot oven. It's an elegant but simple way to feed a crowd.
Recipe by Silvia Baldini — This is the most tender of all cuts of beef but it is less flavorful than those coming from a muscles of animals. I like to unroll the cylinder of the fillet by butterflying it with a sharp knife until I obtain a rectangular shape of even thickness. I cover the surface after a good seasoning with chopped herbs, or chopped bacon, mushrooms, caramelized onions or shallots and cheese, roasted peppers or truffles. I roll up the filet and tie it with kitchen rope then after a good browning on the stove, I finish the filet in a hot oven. It's an elegant but simple way to feed a crowd.
Open and butterfly the filet. Use a sharp-boning knife and cut the beef starting from the center using the tip of the knife and gently unrolling while cutting. Maintain at least a 3/4 of an inch thickness. Flatten in to a regular rectangle.
Preheat the oven at 350 degrees F. Season with salt and pepper and cover the surface with the chopped herbs, or what ever you are using. Roll the beef tight and tie with kitchen string in even sections. Season the outside.
Heat a pan with vegetable oil. Sear the meat on all sides until browned. Roll it over every minute with a pair of tongs. Transfer the fillet to a hot oven and cook for 20-25 minutes for medium rare to medium. Rest the meat outside the oven for at least 10 minutes, untie and slice before serving.
A Ratatouille is a beautiful summer excuse to transform humble ingredients like onions, garlic and herbs in to a glorious and delicious dish. This recipe is very healthy but packed with big flavors. I use zucchini but you could add eggplant, peppers and thin slices of potatoes for a more powerful version.
In a food processor add the chopped tomatoes, shallot, carrot and the garlic. Chop all the vegetable but stop before they become a puree', leaving a rough texture.
Pour the chopped vegetables, 1 Tablespoon of olive oil and half of
the chopped fresh herbs into a medium baking dish. Season with salt and pepper.
Using a mandolin, or a really sharp knife, thinly and evenly, slice the vegetables. Make the slices thin, about 1/8’ (3mm) thick.
Make mini-stacks of about 20 slices in sequence. Arrange a few stacks at a time into the prepared baking dish in a concentric spiral from the outer edge to the inside, fanning them out a bit so that you can see the top 1/8” of all the slices. “Stand” them up a little, so you can it as many vegetable slices in as possible, but you may still have some leftover veggies. Save the smaller rounds for the center of the dish.
Drizzle with the remaining tablespoon of olive oil and season with more salt and pepper. Sprinkle the remaining chopped herbs. Cover the dish with a piece of parchment paper cut to it just inside the dish rim, directly on top of the vegetable arrangement.
Pulse flour and salt in a food processor until combined. Add butter, and pulse until mixture resembles coarse meal, about 10 seconds. Drizzle 1/4 cup ice water evenly over mixture. Pulse until mixture holds together when pressed between 2 fingers (dough should not be wet or sticky). If dough is too dry, add more water, 1 tablespoon at a time, and pulse.
Shape dough into 1 large disk or 2 small disks, and wrap in plastic wrap. Refrigerate until firm, at least 1 hour.
Recipe by Silvia Baldini —The marriage of cream, milk, eggs and sugar is the foundation for a silky and vanilla-scented custard. Bake it gently and slowly in a water bath, then top it with a crisp caramel, brûlée and crack it open with a spoon at the table. Add a touch of citrus zest, chocolate or a splash of liquor for an extra kick.
Recipe by Silvia Baldini —The marriage of cream, milk, eggs and sugar is the foundation for a silky and vanilla-scented custard. Bake it gently and slowly in a water bath, then top it with a crisp caramel, brûlée and crack it open with a spoon at the table. Add a touch of citrus zest, chocolate or a splash of liquor for an extra kick.
Split the vanilla bean. Scrape the seeds with the tip of a small knife. Combine the cream with the vanilla seeds and the spilt bean in a heavy bottom medium pot. Stir over medium heat until it reaches the boiling point. Set aside and steep until it cools down.
Preheat the oven at 325 degrees. Line a baking pan with high sides with paper towel. Boil a pot of water and set aside.
Whisk eggs yolks in a bowl with sugar and salt. Remove the vanilla beans from the cream. Add the cream mixture very slowly in to the yolks, whisking well after every addition. Once blended place the cream in 6/8 small 4-ounces ramekins or in one large baking dish.
Place the ramekins in the lined baking pan and slowly add half of the hot water in to the pan. Place the pan in the heated oven and fill it with the remaining water. Water should cover at least 3/4 of the ramekins sides but not reach the top.
Bake for 35/40 minute or until centers are softly set and still creamy. Remove the ramekins from hot water when cool enough to handle.
Cover the dishes and refrigerate for two hours or up to two days.
To serve, sprinkle each ramekin with sugar and caramelize with a blow torch or under the broiler. Enjoy while the tops are still hot and custard is cool.
Recipe by Silvia Baldini—Sweet and plump cherries, chocolate, almonds and brown butter all baked on a crispy crust. These crumbly bars are a great late spring — early summer treat. Add a generous scoop of vanilla ice cream or a dollop of whipped cream to turn them in to a decadent dessert. Substitute the cherries with raspberries or blackberries, or even halved and pitted apricot. Soft, chocolaty and fruity. A small triumph of flavors and textures.
Recipe by Silvia Baldini—Sweet and plump cherries, chocolate, almonds and brown butter all baked on a crispy crust. These crumbly bars are a great late spring — early summer treat. Add a generous scoop of vanilla ice cream or a dollop of whipped cream to turn them in to a decadent dessert. Substitute the cherries with raspberries or blackberries, or even halved and pitted apricot. Soft, chocolaty and fruity. A small triumph of flavors and textures.
Preheat over to 375°F. Line bottom and sides of 8×8-inch square baking pan with baking paper. Leave paper two inches over the rim. It will help you lift the bars once baked.
mix melted butter, sugar, and vanilla in medium bowl, Add flour, almond flour, cocoa powder and salt and stir until incorporated. Transfer dough to your prepared pan, press the dough evenly across the bottom of the pan. Prick crust with a fork to prevent from puffing up. Bake the crust until golden, about 18 minutes ,Transfer crust to rack and cool in pan.
Filling
Cook butter in heavy small saucepan over medium heat until deep nutty brown (do not burn), stirring often and watching carefully, about six minutes. Cool slightly.
Whisk sugar, eggs, and salt in medium bowl to blend. Add flour, chocolate powder and vanilla and whisk until smooth. Gradually whisk browned butter into sugar-egg mixture; whisk until well blended.
Scatter pitted cherries and chocolate in bottom of cooled crust. Pour browned butter mixture evenly over the fruit and chocolate. Bake until filling is firm and tester inserted into center comes out clean, about 40 minutes, Cool completely in pan on rack.
Remove cooled bars from pan lifting from the overhanging paper and place them on a cutting board . Cut them into squares with a very sharp knife.
Recipe by Silvia Baldini—Flank demands a good marinade to add flavor but also to promote browning and crispness. It needs high heat quick grilling, a mandatory slice against the grain at an angle, and resting time. I marinate the meat for thirty minutes to two hours. For rare steak, I grill it on really high heat for three to five minutes on each side, depending on the thickness. Larger steaks might take longer.
Recipe by Silvia Baldini—Flank demands a good marinade to add flavor but also to promote browning and crispness. It needs high heat quick grilling, a mandatory slice against the grain at an angle, and resting time. I marinate the meat for thirty minutes to two hours. For rare steak, I grill it on really high heat for three to five minutes on each side, depending on the thickness. Larger steaks might take longer.
2 tablespoonsespresso powderbrewed strong coffee can be substitute
1tablespoonsherry vinegar
salt/ black pepper
olive oil
Servings:
Instructions
Marinate the steak. Place the steak in a ziplock bag. Mix the garlic, whiskey, honey or syrup, soy, coffee and vinegar until well combined, then pour over the steak and close the ziplock bag.
Chill for at least 2 hours and up to 24 hours in the fridge. Return to room temperature before cooking.
Remove the steak from the marinade. Put the marinade in a small sauce pan and reduce over medium heat, Bring to a boil then simmer until thickened. About 5 minutes. Reserve.
Cook the steak. Season well with salt and pepper. And drizzle a little oil on it. Heat a grill pan or a regular pan over high heat. Grill the steak 4 to 6 minutes per side for medium rare.
Let the steak rest for at least 5 minutes. Slice at an angle and against the grain. Drizzle the reserved and warmed marinade over the steak before serving.


